Microsoft’s Windows 98 – Reinstall Windows with a boot disk and from the hard drive
Welcome to Microsoft’s Windows 98 reinstall step by step using a boot disk and from the hard drive. This will give you an idea on how to do this when and if the time arises for you to either reinstall the operating system, install for the first time or upgrade your present operating system. This install guide is fully graphical and will take you through each step of the installation.
What you will require to do this walkthrough is
- A Windows 98 CD
- A Windows 98 Floppy Boot Disk
- A Computer with CD-ROM access
To start this Windows install. First check that the first boot device in your system BIOS is set to the Floppy Drive.
( To find out how to access the BIOS please refer to your motherboard manual or the manufacturer of your computer. (The system bios can usually be entered on boot, usually by pressing the F1, F2, F8, F10 or DEL key. Make sure you save the settings before exiting))
If you are unsure or don’t want to enter the BIOS then just test the computer by putting the CD-ROM and floppy disk in their drives and reboot the computer.
You will know that your computer will/has booted of CD-ROM when the following screen appears.
| PART 1 |
The Microsoft Windows 98 Startup Menu, will appear, select option 2 either using the arrow keys or by just pressing the number 2 on the keyboard, press enter. and wait until you arrive at a Dos Prompt

You may already be at the CD-Rom prompt, if not type “D:” and hit enter (that is assuming your CD-Rom letter is D:). To confirm where you are type “CD WIN98“, if the directory changes you are in the right place, if not try “E:“, repeating the process, and continuing up the alphabet until you get to Win98 folder. In the example below it is “D:\WIN98“.

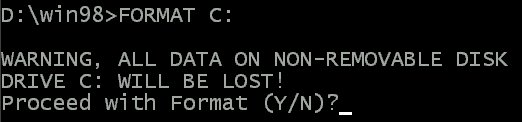
Now assuming you are reinstalling Windows 98, you type “FORMAT C:”
WARNING : This will remove all information from your hard drive, so make sure you have backed up all the stuff you do not want to loose.
Press “Y” and enter to continue Format once you are satisfied that you have to nothing to loose
Now Type “MD C:\WIN98” and press enter. (This Creates a folder on the Hard Drive called WIN98)
And then Type “COPY *.* C:\WIN98” and press enter (this copies the Installation files to your Hard Drive)

Now type “C:\WIN98” (You are changing to the WIN98 folder on the Hard Drive)
And finally type “Setup” (Windows 98 will start installing)

You Should now remove the Windows 98 CD and Windows 98 Boot Disk, they are no longer required
Now press Enter to continue, or F3 to exit.
Setup will now perform checks on your system, press Enter to continue.
Next Scandisk will run, let this complete or setup.
Now setup will copy important files for the install.
| PART 2 |
Setup has now begun, the mouse should now be active, press Continue to proceed. If you have a change of mind then press Exit Setup. If the mouse is not active press “ENTER” on the keyboard.
The wizard will now start. Be patient this may take a few moments.
Now select the directory you wish to install Windows into. By default C:\Windows will be selected. You can change this, but it is not advised. Click on Next to Continue.
Setup will now prepare the directory, be patient this may take a moment.
Setup now checks disk space.
What do you wish to install. We recommend Typical, which is the default. So click Next to continue.

Windows Components to be installed will now be listed. Leave at default and press Next.
If a Network card has been detected the following will appear. Fill in the details and click Next.
Now your country settings, select as needed and then press Next.
Windows will now copy files, this will take sometime. Be patient
| PART 3 |
After sometime you will be prompted to restart, Windows will do it itself, you can click on Restart Now to quicken the process. Before you restart remove the floppy boot disk from the drive.
Booting for first time screen will appear.

Now enter your name, company is optional. Click on Next to continue.
Now the License Agreement. Read and if you agree click on “I accept the Agreement” and click next. If you select “”I don’t accept the Agreement” then setup will end.
Now input your product key or certificate authenticity code. This is 16 digits and is located on the back of your CD case or on the Windows 98 Book. If you have an OEM computer then it could be on the side or back of your computer. Click next to continue.
Next click on Finish.
| PART 4 |
Setup will now finalize the hardware and install settings.
Plug and Play Devices…..

Your computer will prompt to restart….
Windows is booting.

and continuing the install of devices.
| PART 5 |
Now select your date/time settings, using the down arrow beside GMT -0800.
Once selected click on apply and then OK.
Windows will continue to setup Windows items.
The computer will now need restarted again.

| PART 6 |
Windows will continue to load.
and update System Settings.
At long last you have arrived at the desktop.
If you are lucky you will have no drivers to install, but chances are the next step will be to install them. Check out device manager for unknown devices, likely items are Network Cards, Sound Cards, Printers, Scanners, Graphics Cards, Digital Cameras, plus any other item you have.
| THE END |

Recent Comments